| Status | ||||
|---|---|---|---|---|
|
| Warning |
|---|
| Note |
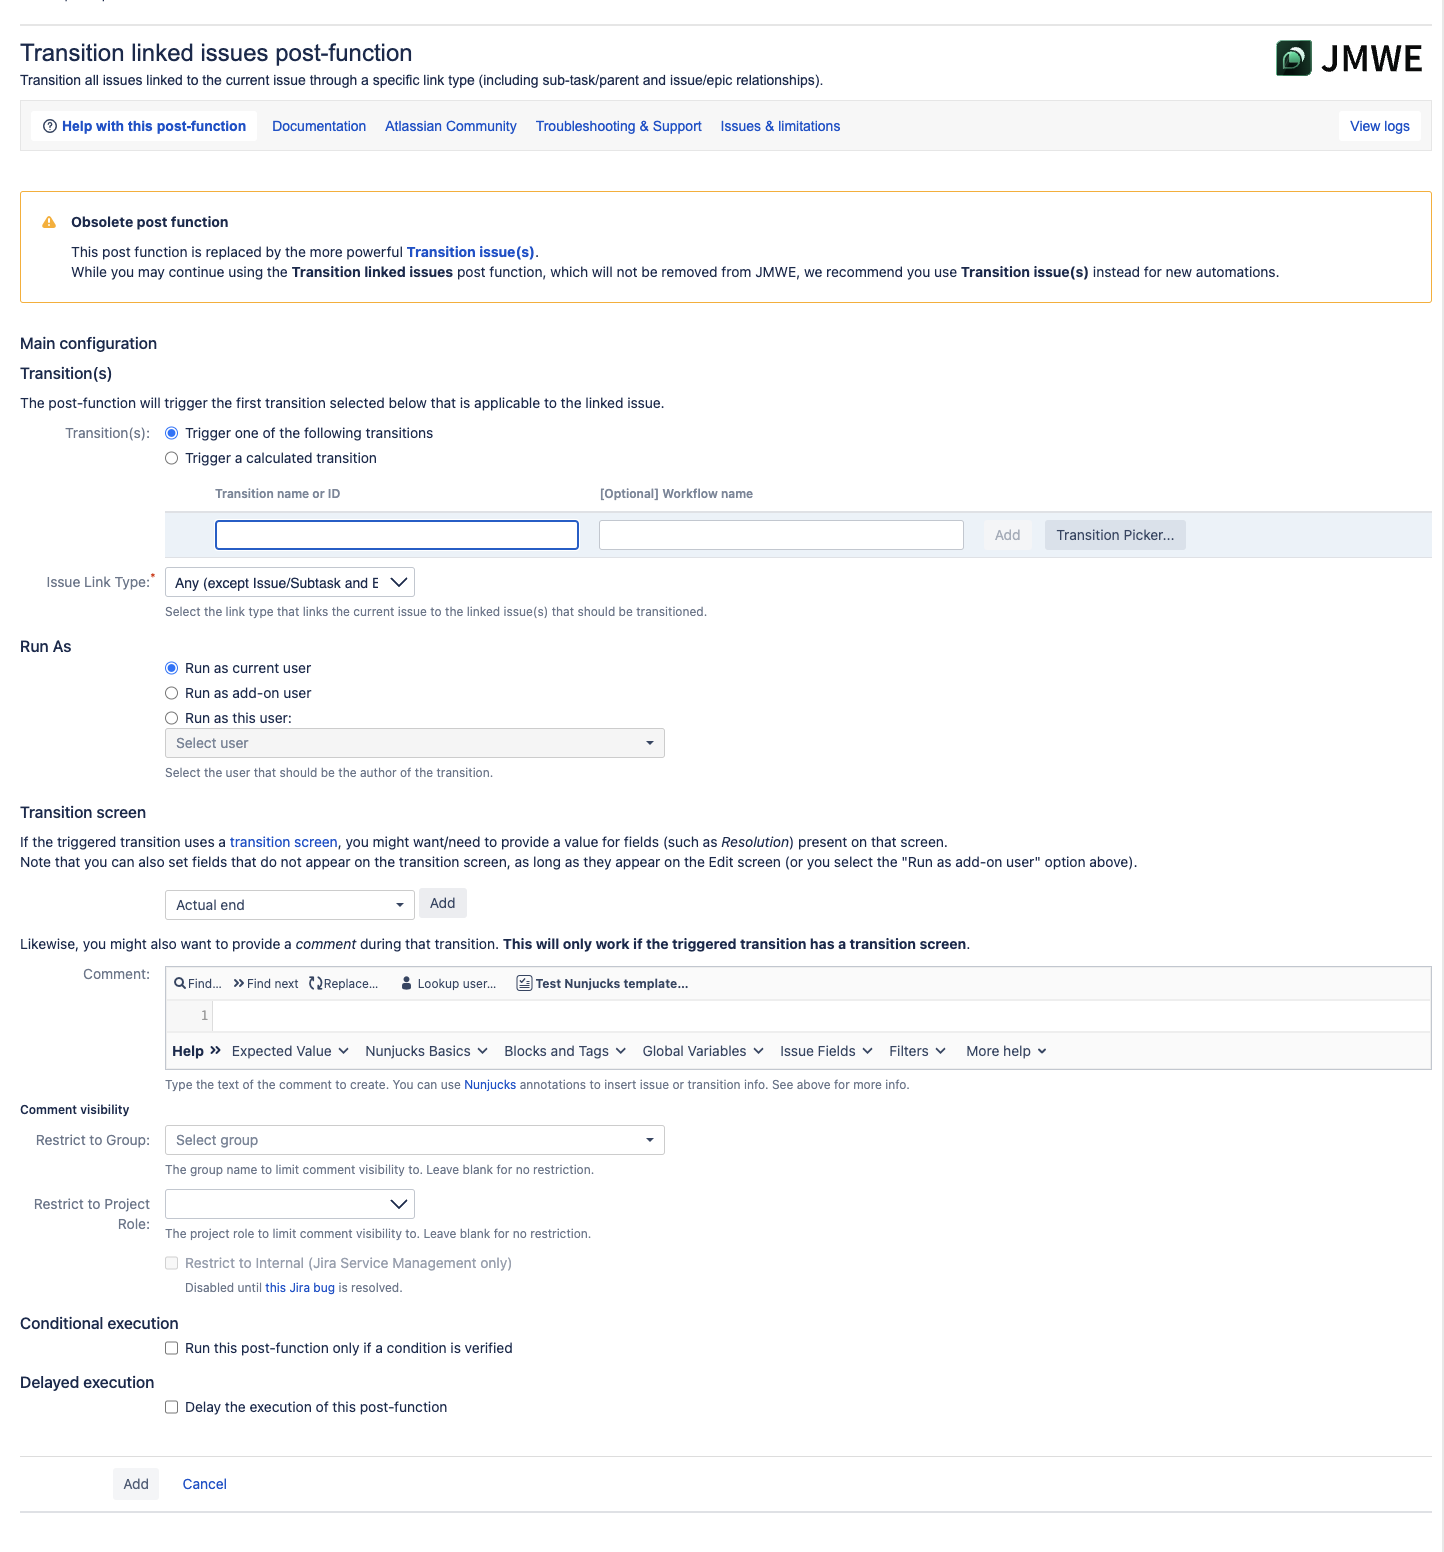
This post-function is deprecated. We recommend using the more flexible obsolete. While you may continue using this post function, which will not be removed from JMWE, we recommend you use the more powerful Transition issue(s) post-function instead. However, existing Transition Linked Issues post-functions will continue to work instead for new automations. |
| Excerpt |
|---|
A workflow post-function that triggers a transition on all issues linked to the current issue through a selected link type. |
To add 'Transition linked issues' post-function to a transition :
Click Edit for the workflow that has the transition you wish to add the post-function on.
In the Workflow Designer, select the transition.
Click on
Post Functionsin the properties panel.Click on
Addpost function.Select
Transition linked issuesfrom the list of post-functions.Click on
Addto add the post-function on the transition..png?version=1&modificationDate=1588594679368&cacheVersion=1&api=v2&width=312)
Specify transition(s) either in the table or as a result of the calculated Nunjucks template. See below for more information.
Select the link from the
Issue Link Typedrop-down.Click on
Addto add the post-function to the transition.After adding, move the post-function to the appropriate position according to Placing post-functions in a transition document.
Common to all post-functions:
| Filter by label (Content by label) | ||||||||||||||||||
|---|---|---|---|---|---|---|---|---|---|---|---|---|---|---|---|---|---|---|
|
Specific to this post-function:
| Filter by label (Content by label) | |||||||||||||||||||||
|---|---|---|---|---|---|---|---|---|---|---|---|---|---|---|---|---|---|---|---|---|---|
|
| Panel | ||
|---|---|---|
| ||
For information on where the post-function needs to be placed on a transition, see Placing post-functions in a transition. Refer to the Use cases for the post-functions page for use cases for this post-function. Refer the Troubleshooting and Support page if the post-functions does not seem to be working as you would expect. |
When you add this post-function to a transition and trigger the transition, the add-on will trigger the specified transition on each issue linked to the current issue through the selected link type, assuming that transition is valid for the linked issue's current status, and it is available to the current or the specified user.
Transition(s)
Trigger one of the following transitions
Input the transition name(s) or id(s) and optionally the workflow name manually or using the Transition picker. If you do not specify the workflow name (manually) the app will not check for a specific workflow. The app triggers the first transition specified in the table that is applicable to the issue in context.
To pick a transition using the Transition picker:
Click on Transition picker
Choose a workflow from Workflow name
Select a transition from the list of transitions displayed
Finally, click on either
Use Transition Name- recommended if you want the post-function to search for the transition to trigger by name, which is useful when targeting multiple workflows.Use Transition ID- if you want to differentiate between transitions that bear the same name.
Click on Add.
To remove a transition: Click on the Remove link for the specific transition
To reorder transitions: Select and move the transition in the table to reorder the list
Trigger a calculated transition
Input a Nunjucks template that returns one or more transition name(s) or id(s) and optionally the workflow name. To specify a workflow name, write a Nunjucks template that returns the transition name or ID along with the workflow name separated by @@. For example: Done@@HR workflow.
To return multiple transitions, write a Nunjucks template that returns transition names or IDs each on a separate line. For example:
| Code Block | ||
|---|---|---|
| ||
2@@Default Jira Workflow Done@@Another workflow Close |
Example of a template returning transition name:
| Code Block | ||
|---|---|---|
| ||
{%if issue.fields.priority.name == "Blocker"%}
  Escalate
{% else %}
  Assign
{% endif %} |
Run As
Run as current user: The current user will be the author of the transition triggered by the post-function.
Run as add-on user: The add-on user will be the author of the transition triggered by the post-function.
Run as this user: Any user selected in this field will be the author of the transition triggered by the post-function.
Transition screen
If the transition uses a transition screen you might want/need to provide a value for fields (such as Resolution) present on the screen. Look below to know how to add/set/remove fields.
To add a field : Select a field from the list of fields and click on
Add.To Remove an added field : Click on
Removeto remove a field.To Set a field value:
Copy value from current issue : Copies the field value(s) from the current issue.
Set field value to : You can set the field to a specific value, wherein the value can also include Nunjucks annotations.
For example : To set the Fix Version/s to 2.0, you can specify2.0in the value box.
Likewise, you might also want to provide a comment during that transition. This will only work if the triggered transition is associated with a transition screen.
Comment : adds a comment to each linked issue being transitioned. The
Commentcan be any simple text, e.g.This is a comment.You can also use Nunjucks annotations in the comment using variables. To find out more about the variables, see How to insert information using Nunjucks annotations.Comment visibility :
Restrict to Group : Restricts the visibility of the comment to a specified group. When you select a valid group name in the
Restrict to Groupfield, the comment will be visible only to the members of the specified group. For no restriction, leave the field blank.Restrict to Project Role : Restricts the visibility of the comment to a selected project role. When you select a project role from the drop-down
Restrict to Project Rolefield, the comment will be visible only to the members of the selected project role. For no restriction, leave the field blank.Restrict to Internal (Jira Service Desk only) : Restricts the visibility of the comment to the Service Desk Agents and Collaborators only.
Conditional execution
To execute this post-function based on the result of a Nunjucks template see Conditional execution.
Delayed execution
| Include Page | ||||
|---|---|---|---|---|
|
| Info |
|---|
The options Run as add-on user and Run as this user are useful if the current user doesn't have the permission to transition the linked issue(s). |
| Info |
|---|
The transition can be specified by name so that the transition can be found regardless of each linked issue's actual workflow, or by ID if disambiguation is required. |
| Info |
|---|
Note that you can use this function to transition:
|