This page allows you to create Event-based actions, with one or more JMWE post-functions, that are run when a change is made to an issue, such as fields being modified, the issue being transitioned, a comment being is added, etc.
Some examples of what can be achieved through Event-based Actions are:
Synchronizing changes to a field with related issues such as sub-tasks, linked issues, epics, etc.
Calculating the value of a field based on the values of other fields (view this demo)
Copying a comment added by a customer on a Service Management request to linked Jira Software issues
Validating data when a user edits an issue field on the issue view screen (view this demo)
On this page:
| Table of Contents |
|---|
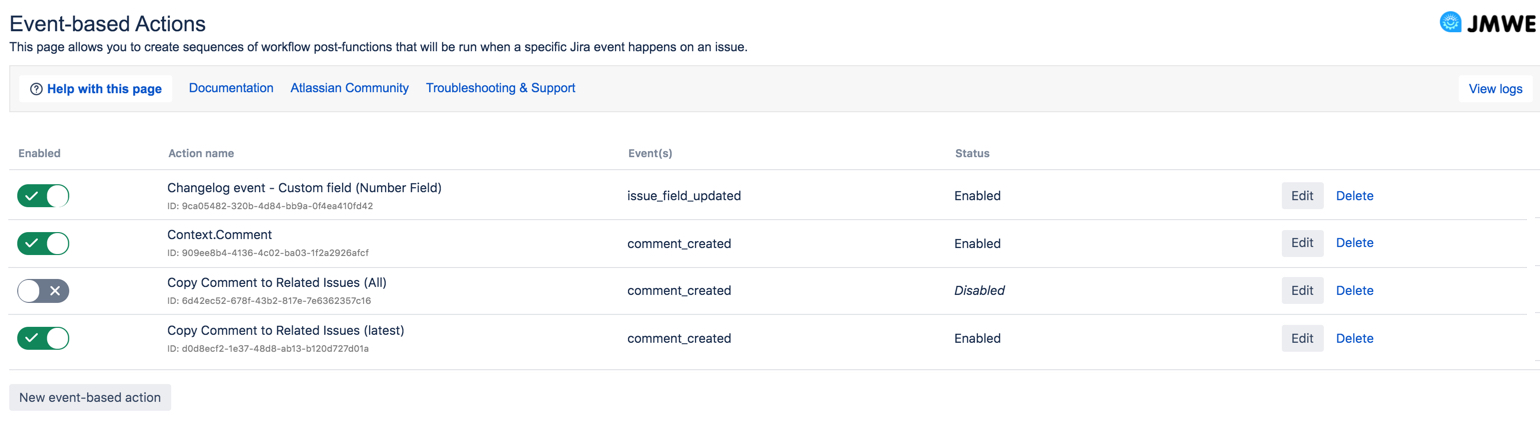
Create an event-based action
To create an event-based action:
Navigate to the Jira Settings → Apps → Event-based actionsClick on "New . This page lists the existing event-based action"
Click on "Save"
Edit an event-based action
Click on “Edit” for the event-based action
Modify the action details
Click on “Save”
Delete an event-based action
Click on “Delete” for the event-based action
Click on “OK”
The event-based action is deleted.
Enable/disable an event-based action
Click on “Disable” if the event-based action is currently enabled, or “Enable” if the event-based action is currently disabled
Click on “OK”
The event-based action is enabled or disabled.
Event to listen to
Configure which Jira event should trigger this Action. You can listen to the following events:
Issue Created: this is triggeredactions with the respective Status, Action name, and Event(s) details.
Click
New event-based actionto navigate to the Event-based Action Editor screen where you can configure the following details: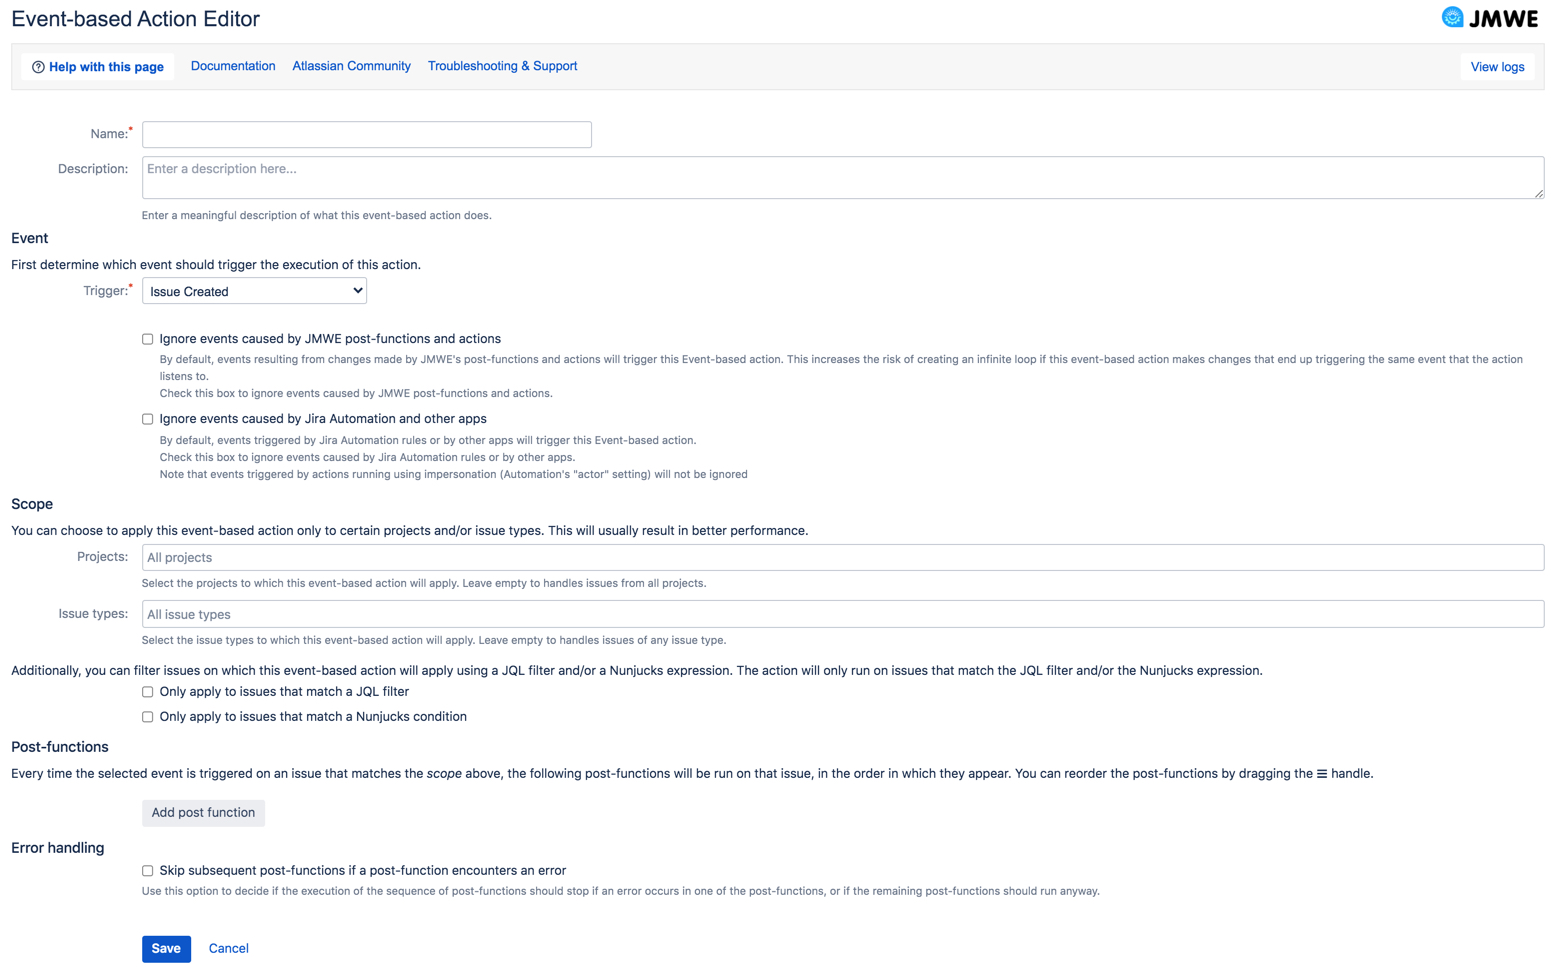
Name (mandatory): Enter a meaningful name.
Description: Enter a more detailed explanation of what the action would accomplish.
Event: Select the Jira event that triggers the action from the following:
Trigger (mandatory):Issue Created (default option): Triggered when a new issue is created, including when an issue is cloned.
Issue Updated:
Triggered when an issue is modified, such as being edited or transitioned.
Issue Deleted: Triggered when an issue is deleted.
Issue Commented:
Triggered when a comment is added to an issue.
Issue Transitioned:
Triggered when a transition is performed on an issue. You can optionally filter the source and/or destination statuses of the transition.
Issue Field Value Change:
Triggered when one of the fields you have selected is modified on an issue
Ignoring app-related events
You can choose.
Attachment Created: Triggered when an attachment is added to an issue.
Attachment Deleted: Triggered when an attachment is deleted from the issue.
Issue Link Added: Triggered when an issue link is added to an issue.
Issue Link Deleted: Triggered when an issue link is deleted to an issue.
Work Log created: Triggered when a worklog entry is added to the issue.
Work Log updated: Triggered when a worklog entry is updated on the issue.
Work Log deleted: Triggered whenever a worklog entry is deleted from the issue.
Ignore events caused by JMWE post-functions and actions: Select this option to ignore events resulting from changes performed by JMWE post-functions and
actions that trigger this event-based action. If you do not select this option, it increases the risk of creating an infinite loop if this event-based action makes changes that end up triggering the same event that the action listens to.
Ignore events caused by Jira Automation and other apps: Select this option to ignore events resulting from changes performed by Jira Automation rules, or by other apps. For example, if you have configured an event-based action to listen to the Issue
Transitioned event, you might care only about comments created by users, and want to ignore
transitions performed by an Automation rule.
To ignore events caused by JMWE post-functions and actions, check the Ignore events caused by JMWE post-functions and actions checkbox.
Likewise, you can choose to ignore events resulting from changes performed by a Jira Automation rule or by another app. For that, check the Ignore events caused by Jira Automation and other apps checkbox.
Scope
Filtering by project and issue type
You can choose to apply an event-based action only to certain projects and/or issue types. This will usually result in better performance.
To apply the event-based action only to certain projects, select one or more projects under Projects. If you don’t select any project, the event-based action will apply to issues from all projects.
To apply the event-based action only to certain issue types, select one or more issue types under Issue types. If you don’t select any issue type, the event-based action will apply to issues of all types.
Filtering using a JQL expression
You can choose to apply an event-based action onlyScope: Specify the project(s) and issue type(s) on which the action is run. You can further choose to apply the action on the issues that match a JQL filter or Nunjucks condition.
Projects: Select one or more projects from the available options for the action to be applied on. When you leave this field empty, the action is applied to all the projects in your Jira instance.
Issue types: Select one or more issue types from the available options for the action to be applied on. When you leave this field empty, the action is applied to all the issue types in your Jira instance.
Only apply to issues that match a JQL filter
: Select this option to apply the action on issues that match
a JQL filter.
Click
Edit JQLto search
Check the “Only apply to issues that match a JQL filter” checkbox
Click on "Edit JQL"
- Input a JQL expression that will return the issues on which the action should be run. See here to know how to write a JQL. For example
Check the “Only apply to issues that match a Nunjucks condition” checkbox
- Input a Nunjucks template that will return
for issues using a JQL filter in the JQL editor window and click
Submit.
Example:Code Block language sql project = TEST and issuetype = Bug
Click on "Search" to check the issues returned by the JQL. It is recommended to check the results of the JQL to avoid invalid JQL.
Click on "Submit"
Filtering using a Nunjucks condition
You can choose to apply an event-based action only to issues that match a Nunjucks condition. The action will only run on issues for which the Nunjucks template returns true (or any value that is neither empty nor false).
Only apply to issues that match a Nunjucks condition: Select this option to apply the action on issues that match the Nunjucks condition mentioned in:
Nunjucks condition: Enter a Nunjucks template that returnstrue(or any value that is neither empty norfalse) for any issue on which the action should run.
Example:Code Block language sql {{ issue.fields.project.key == "TEST" and issue.fields.issuetype.name == "Bug" }}Click here to understand how to pass variables within a sequence.
Post-functions
Whenever the event is triggered by Jira, and if the issue belongs to the Scope defined above, the configured post-functions will be run, in the order in which they appear. You can reorder the post-functions by dragging them using the ☰ handle.
Add a post-function in an action
Click on “Add post-function”
Select the post-function
Configure the post-function
Click on “Save”
Edit a post-function in an action
Click on “Edit” for the specific post-function
Modify the post-function
Click on “Save”
Reorder the post-function sequence in an action
Drag the ☰ handle and reorder the post-functions
Remove a post-function in an action
Click on “Remove” for the specific post-function
: Click
Add post-functionto navigate to the window that lists all the available post-functions. Select a post-function, configure it as needed and add it to the list here. The post-functions added here are run in the sequence displayed. You can use the ☰ handle to drag a post-function and drop it wherever required in the list to reorder the sequence.Error handling
Skip subsequent post-functions if a post-function encounters an error: Select this option to skip running the remaining post functions in the sequence when an error occurs in one of the post functions.
Click
Saveto add the newly created event-based action to the Event-based action screen.
Events
Issue Deleted: When you select thisevent, the Post-functions configured to update the current issue will fail because the issue is already deleted. However, you can still copy the current issue field values if required (for example, if you configure the Copy Issue Fields post-function, you can copy field values from the current issue to a specified issue(s)).
Issue Link Added, Issue Link Deleted: When you select one of these events, the Post-functions configured are run on the issues based on the direction of the associated issue link type. For example, when the issue link type between a Dev task and Testing task is Dev
is blocked byTesting, the post-function is run on the Testing task.
Ignore events caused by Jira Automation and other apps
Events triggered by actions running using impersonation (Automation's "actor" setting) are not ignored.
This option is disabled when one of the following events is selected:
Attachment Deleted
Issue Link Added
Issue Link Deleted
Work Log Updated
Work log Deleted
Edit an event-based action
Click
Editin the Event-based actions screen to modify the respective event-based action.Modify the action details in the Event-based Action Editor screen.
Click
Saveto save the changes.
Delete an event-based action
Click
Deletein the Event-based actions screen to remove the respective event-based action permanently.Click
OKin the confirmation dialog to confirm. The event-based action is deleted.
Enable/disable an event-based action
In the Event-based actions screen, turn the toggle Off or On in the Enable column to disable or enable the respective event-based action. By default, a newly created event-based action is enabled.
Pass variables within a sequence
Using the {% setContextVar %} Nunjucks tag you can pass data from one post-function to all subsequent post-functions.
context: Holds all the context variables added in the current post-function. For example, if you create a context variable
myVarin the first post-function of the sequence:Code Block language js {% setContextVar myVar = "a value" %}This variable will then be available to all its subsequent post-functions as:
Code Block language js {{ context.myVar }} Note
Note
Note that this variable will not be available in the Nunjucks tester.
Variables specific to the Create Issue post-function
newIssueKey:Stores the issue key of the last issue created by a Create Issue(s) post-function in the action. You can access it as:Code Block language js {{ context.newIssueKey }}newIssueKeys:Stores an array of the keys of all the issues created by any Create Issue(s) post-function in the action. You can access the created issues fromCode Block language js {{ context.newIssueKeys }}For example: to add a comment on the current issue with the keys of the issue created
Code Block language js Issues created are: {{ context.newIssueKeys | join(",") }}
You can access the information of a specific issue using the issue filter. For example: To get the assignee of the issue created by the Create Issue post-function
| Code Block | ||
|---|---|---|
| ||
{{ context.newIssueKey | issue("assignee") | field("fields.assignee.displayName") }} |