Scheduled actions allow you to run one or more JMWE post-functions (in a sequence) at a specified time interval on the issues returned by a JQL search. You can use scheduled actions to:
Send emails automatically every day.
Transition an issue automatically based on the amount of time spent in a status.
Create a new issue and set specific field values every week.
Escalate issues automatically.
Update issue with information from another Jira instance every hour.
and more..
Navigate to the Scheduled actions page using Jira Settings → Manage apps → Scheduled actions. This page displays:
Enabled - Status of a scheduled action.
Schedule (in UTC time) - Interval at which a scheduled action is run. When you hover over the schedule, the time at which the next run is scheduled is displayed.
For disabled scheduled actions, the next run is displayed as disabled when hovered on the schedule.Last run: The most recent run of the scheduled action along with the number of issues updated.
| Info |
|---|
The next run time and the last run time are displayed in the time zone settings in the logged-in user’s Profile → Preferences → Time Zone. |
Click Run now to run the respective scheduled action right away.
On this page:
| Table of Contents |
|---|
Add a scheduled action
To add a Scheduled action:
Navigate to Jira Settings → Manage apps → Scheduled actions.

Click
Add scheduled actionon the top right corner to navigate to Scheduled action editor where you can add the configuration details.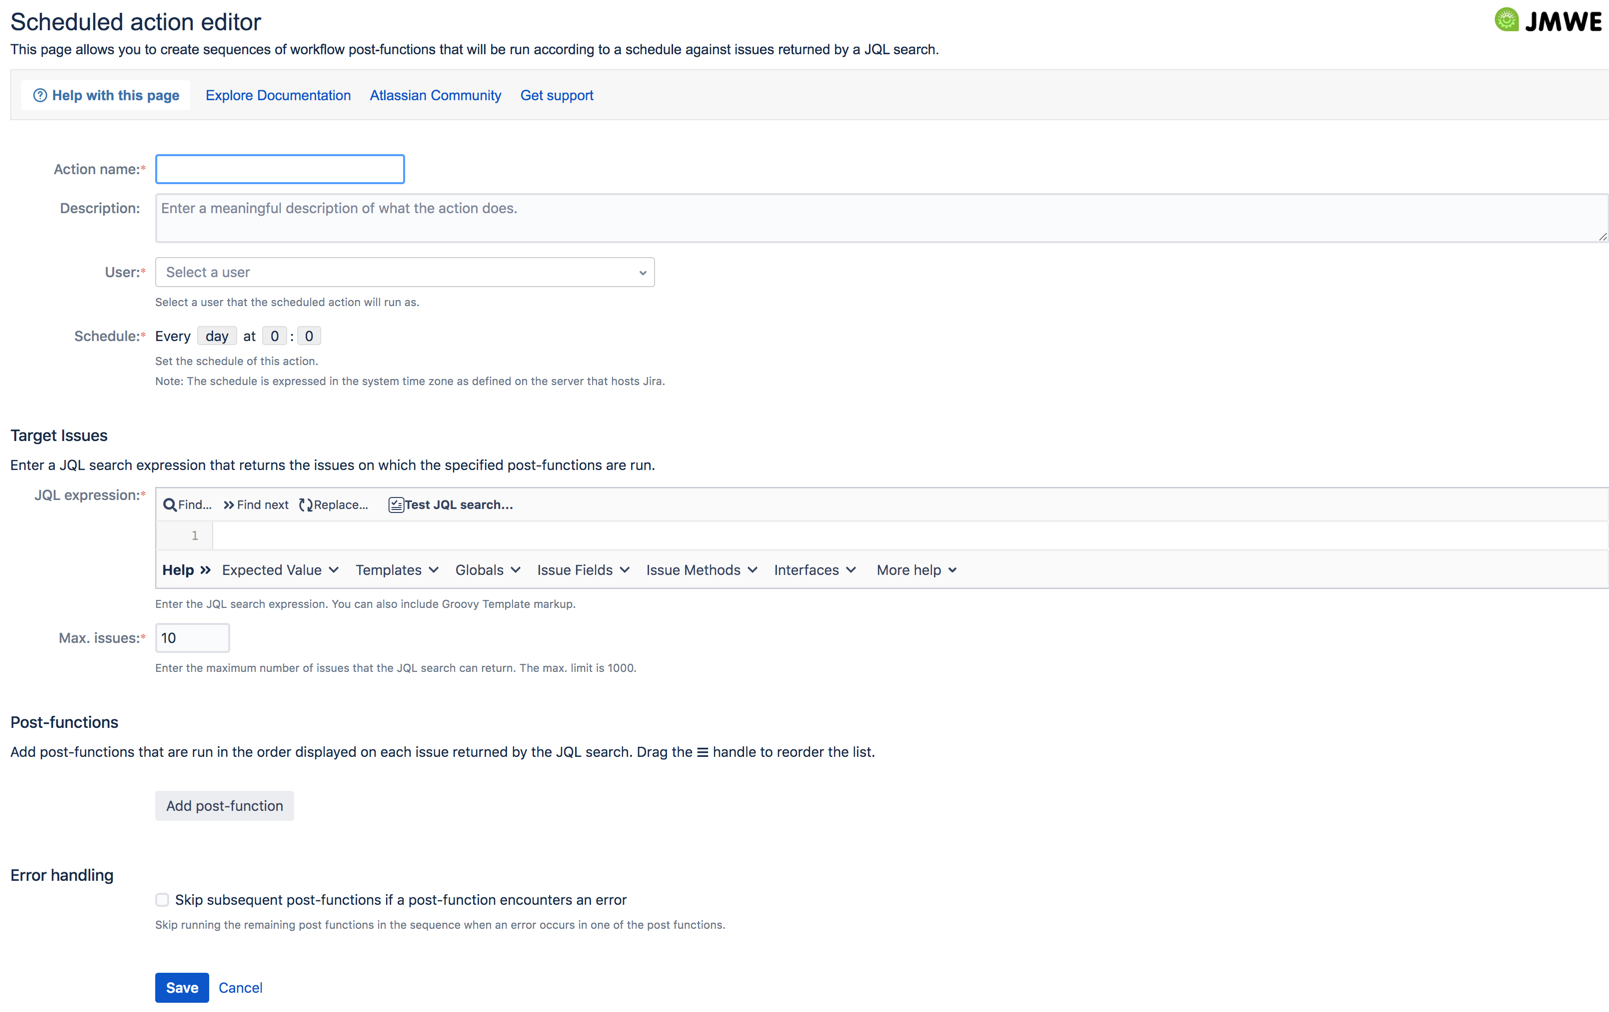
Add the following:Action name (mandatory): Enter a meaningful name for the action.
Description: Enter a more detailed explanation of what the action would accomplish.
User (mandatory): Start typing into the field to select a user from the auto-suggestions. The scheduled action is run as the selected user.
Schedule (mandatory): Set the schedule for this action. This schedule is defined in UTC time. You can run the schedule every hour, every day, every week, every month, or every year at specific times. A schedule can be set as frequently as once every 10 minutes. For examples of different schedules, click here.
Target Issues (mandatory): Select issues on which the specified post-functions are run.
JQL Expression (mandatory): Enter a JQL expression that returns a set of issues. For example, to fetch issues from
ProjAinOpenstatus, use:project = ProjA and status = open
You can also include Groovy Template markup that returns a JQL query. For example, to fetch issues assigned to the current user, use:<% if (issue.get("assignee")) { %> assignee = ${currentUser.name} <% } else { %> issuekey=INVALID-1 <% } %>Max. issues (mandatory): Enter the maximum number of issues that the JQL search can return. The maximum limit here is 1000.
Post-functions: Add one or more post-functions that are run on each issue returned by the JQL search mentioned in the previous section.
ClickAdd post-functionto navigate to the window that lists all the available post-functions. Select a post-function, configure as needed and add it to the list here. The post-functions added here are run in the sequence displayed. You can use the ☰ handle to drag a post-function and drop it wherever required in the list to reorder the sequence.
UseEditorRemoveto make changes to the respective post-function or delete it from the list here.Error handling
Skip subsequent post-functions if a post-function encounters an error: Select this option to skip running the remaining post functions in the sequence when an error occurs in one of the post functions.
Click
Saveto save the configuration and add the scheduled action to the list on the Scheduled actions page.
Examples of schedules
Token | Minutes past the hour | Hour of the day | Day of the Week/Month | Month of the year | Example |
|---|---|---|---|---|---|
Hour | It can be one or more of 0, 10, 20, 30, 40 and 50 | NA | NA | NA | To run the schedule at 10 and 20 minutes past every hour  |
Day | It can be one or more of 0, 10, 20, 30, 40 and 50 | The hours can be one or more of 0 to 23 hours. | NA | NA |

 |
Week | It can be one or more of 0, 10, 20, 30, 40 and 50 | The hours can be one or more of 0 to 23 hours. | One or more days of the week or "every day of the week" to run the action every day | NA |

 |
Month | It can be one or more of 0, 10, 20, 30, 40 and 50 | The hours can be one or more of 0 to 23 hours. | One or more days of the month | NA |

 |
Year | It can be one or more of 0, 10, 20, 30, 40 and 50 | The hours can be one or more of 0 to 23 hours. | One or more days of the month | One or more months of the year |

 |
Edit a scheduled action
Click
Editin the Scheduled actions screen to modify the respective scheduled action.Modify the action details in the Scheduled action editor screen.
Click
Saveto save the changes.
Delete a scheduled action
Click
Deletein the Scheduled actions screen to remove the respective scheduled action permanently.Click
OKin the confirmation dialog to confirm. The scheduled action is deleted.
Enable/disable a scheduled action
In the Scheduled actions screen, turn the toggle Off or On to disable or enable the respective scheduled action. By default, a newly created scheduled action is enabled.