To add the 'Copy issue fields' post-function to a transition:
Click Edit for the workflow that has the transition you wish to add the post function on.
In the Workflow Designer, select the transition.
Click
Post Functionsin the properties panel.Click
Addpost function.Select
Copy issue fieldsfrom the list of post functions.Click
Addto navigate to the Copy issue fields post-function screen where you can configure the post function as needed. Click here for more details.Click
Addto add the post-function to the transition.
After adding, move the post-function to the appropriate position according to Placing post-functions in a transition document.
Click here for a sample use case.
Known issues common to all post-functions:
Troubleshooting this post-function configuration: In case the post-function does not work as expected these are the things to look out for
Configuration details
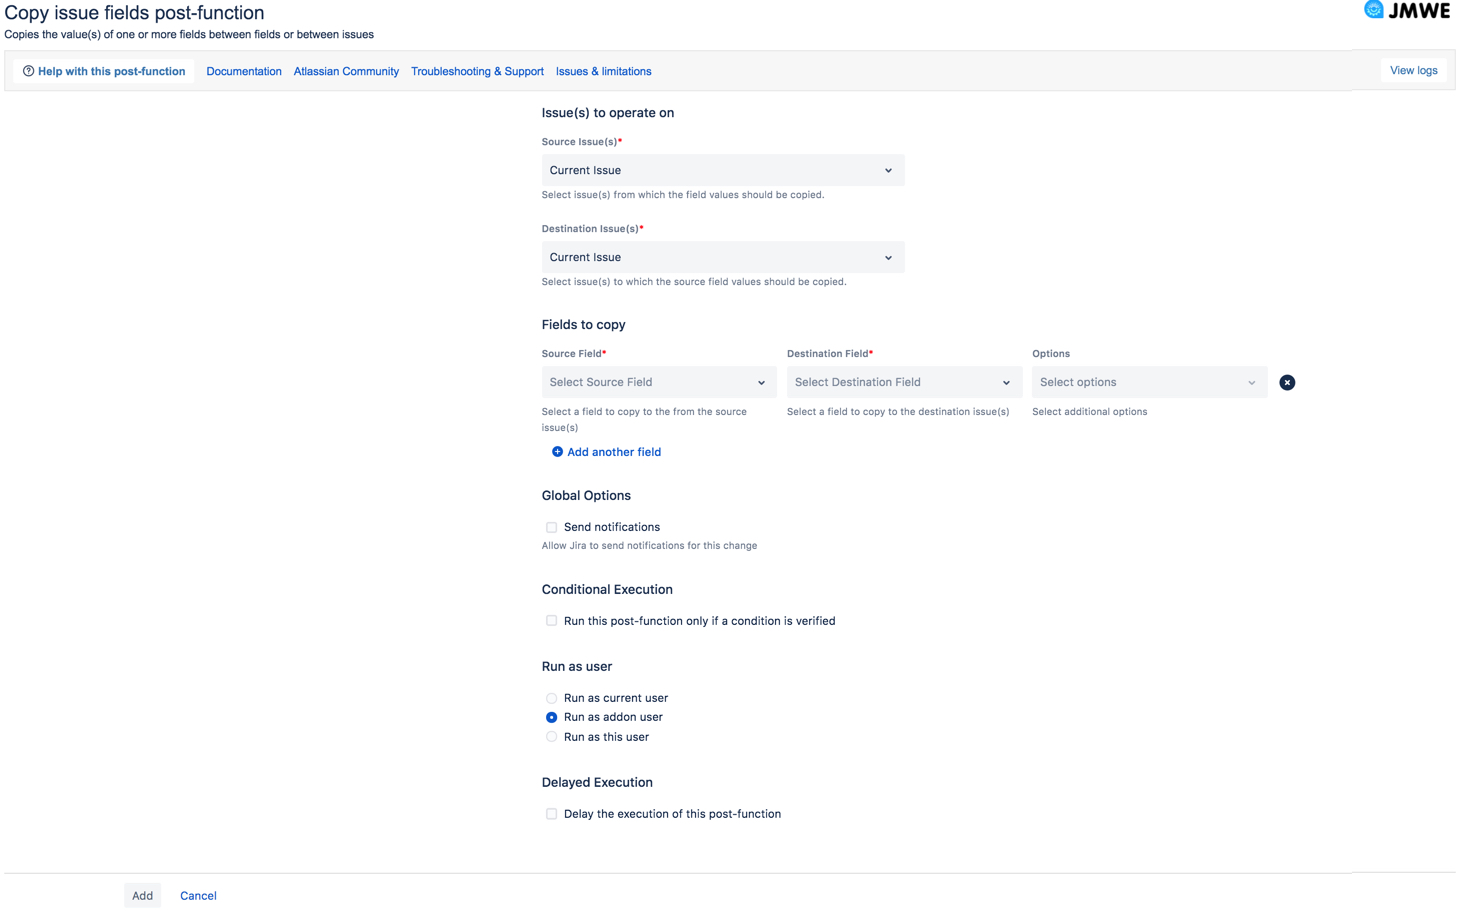
Configure the following details in the Copy issue fields post-function screen:
Issue(s) to operate on
Source Issue(s): Select the issues from which the specified field(s) from the Fields to copy section are copied. Select one of the following:
Current issue: Select this option to copy the value of the selected field(s) from the current issue. This is the default option.
Sub-tasks of the current issue: Select this option to copy the value of the selected field(s) from the sub-tasks of the current issue.
Parent of the current sub-task: Select this option to copy the value of the selected field(s) from the parent of the current issue.
Issues that belong to the current issue (Epic): Select this option to copy the value of the selected field(s) from the issues that belong to the current Epic.
Epic of the current issue: Select this option to copy the value of the selected field(s) from the Epic of the current issue.
Child issues of the current issue in the Portfolio hierarchy: Select this option to copy the value of the selected field(s) from the child issues of the current issue in the Portfolio hierarchy.
Parent issue of the current issue in the Portfolio hierarchy: Select this option to copy the value of the selected field(s) from the parent issue of the current issue in the Portfolio hierarchy.
Issues linked to the current issue through any link type: Select this option to copy the value of the selected field(s) from all the issues linked to the current issue.
Issues linked to the current issue through the following link type: Select this option to copy the value of the selected field(s) from the issues linked to the current issue through a specific link type. Select the specific link type under “Issue link”.
Issues returned by the following Nunjucks template: Select this option to copy the value of the selected field(s) from the issues returned by the result of a Nunjucks template. Enter a Nunjucks template, which is a comma-separated list of valid issue keys. For example:
"TEST-1""TEST-1","TEST-2"{{ issue.fields.parent.key }}{{ issue.fields.subtasks | join(",", "key") }}
Issues returned by the following JQL search: Select this option to copy the value of the selected field(s) from the issues returned by a JQL search. Enter a JQL search expression. For example:
project = TESTreturns issues of the project with the key TESTproject = {{ issue.fields.project.key }} and assignee = {{currentUser._accountId}}returns the issues belonging to the same project as the current issue that are assigned to the current user{% if issue.fields.assignee %} assignee = {{issue.fields.assignee._accountId}} {% else %} issuekey=INVALID-1 {% endif %}
Note that the {% if %} block is necessary to avoid an invalid JQL query when the issue is unassigned. In that case, the template will return a valid JQL query that returns no issue (issuekey=INVALID-1).
Destination Issue(s): Select the issues to which the specified field(s) from the Fields to copy section are copied. The options available here are the same as those from Source Issue(s).
Ensure the number of source issues times the number of destination issues does not exceed a limit of 1000 issues. In such a scenario, the post function will be not run and an error will be logged.
Fields to copy
This section allows you to add a list of fields to copy from the source issue to the destination issue. Specify the following:
Source Field: Select a field from the source issue(s) to copy the respective field value.
Destination Field: Select a field from the destination issue(s) to which the source field value is copied.
Options: Select one or more options for copying the values. Available options:
Set only if field is empty: Sets the value of the selected destination field only if the field in the destination issue(s) is empty.
Create missing value(s): Allows creating any missing component(s) or version(s) while copying to a field that expects Versions or Components. This is applicable for version and component fields.
Ignore empty value: Does not copy the source value to the destination issue, if the source value is empty or null. This means a blank value will not be assigned to the destination field and the respective field value will be retained as-is.
Append value(s) to the field: Appends the value(s) to the selected field of the destination issue, instead of replacing its value. This applies to only multi-valued fields.
Click Add another field to add one more field to the list.
Click the Delete icon next to a field to stop copying that field.
Global Options
Send notifications: Select this option to allow Jira to send notifications for the change in the values of the selected field(s) on the destination issue(s).
Conditional Execution
Run this post-function only if a condition is verified: Select this option to run this post-function based on the result of a Nunjucks template (See Conditional execution). The condition mentioned here is evaluated once per combination of source and destination issue.Run As: Select one of the following:
Run as current user: To set the current user as the author of the field change.
Run as add-on user: To set the add-on user as the author of the field change. (Default option)
Run as this user: To set any user selected in this field as the author of the field change.
Running this post-function as any user other than the "Add-on user" is discouraged
If you select any option other than "Run as add-on user", so that the change appears to be done by the current user or a specific user, the following must be true:
The destination field must be present on the Edit screen applicable to the destination issue
The selected user must have the Edit issues permission on the destination issue
Delayed execution
Post functions are provided with an option to delay their execution. You need to select the number of seconds to wait until the post-function is run, a default of 1 sec to a maximum of 20 seconds.
Workflows that depend on post functions being executed in a specific order fail due to the asynchronous nature of the Connect post-functions in Jira Cloud. One of the workarounds is to delay the execution of the post-functions and thereby create a more predictable execution order. For example, on the approval of a Story you want to create sub-tasks and immediately transition them; in this case, you will have to delay the execution of the Transition Linked Issues post-function, so that the sub-tasks are created before they are transitioned. See the use case below.
It is recommended to use the Sequence of post-functions post-function or Shared Action post-function post-function to run a list of post-functions in a sequence instead of applying a delay.
Sample use cases for Delayed execution
![]() On the creation of a Bug, assign it to a member of the QA team and then add the Assignee to the Watchers.
On the creation of a Bug, assign it to a member of the QA team and then add the Assignee to the Watchers.
![]() On the approval of a Story, create subtasks for Development and QA, and transition them to In Progress status.
On the approval of a Story, create subtasks for Development and QA, and transition them to In Progress status.
JMWE shows an error message on the issue view if any error occurs during the execution of the post-function. This message is only displayed if the current user is a Jira administrator.
Use case
Consider a scenario where you want the Assignee of the current issue to be the Approver of the associated sub-task(s) while making sure the Due date is the same for the current issue and its sub-task(s). To copy the respective field values from the current issue to its sub-tasks for this scenario, perform the following:
Edit the workflow to which you want to add the post function.
Select the transition as needed.
Click
Post Functionsin the properties panel.Click
Addpost function.Select
Copy issue fieldsfrom the list of post functions.Click
Addto navigate to the Copy issue fields post-function screen.Add the following details:
Source Issue(s): Select
Current issue.Destination issue(s): Select
Sub-tasks of the current issueAdd the fields to copy in the Fields to copy section:
Source Field: Select
AssigneeDestination Field: Select
Approver
Click
Add another fieldSource Field: Select
Due dateDestination Field: Select
Due date
Click
Addto add the post-function to the transition.Publish the workflow.