A workflow post-function that creates one or more new issue(s). The specifications of the issue(s) to be created can be customized using the options provided.To add the 'Create issue' post-function to a transition:
Click Edit for the workflow that has the transition you wish to add the post-function on.
In the Workflow Designer, select the transition.
Click
Post Functionsin the properties panel.Click
Addpost function.Select
Create issue(s)from the list of post-functions.Click
Addto navigate to the Create issue(s) post-function screen where you can add configuration details to the post-function. Click here to know more.Click
Addto add the post-function to the transition.
After adding, move the post-function to the appropriate position according to Placing post-functions in a transition document.
Click here for a use case of this post-function.
Known issues common to all post-functions:
Troubleshooting this post-function configuration: In case the post-function does not work as expected these are the things to look out for
Use cases and additional information
Configuration details
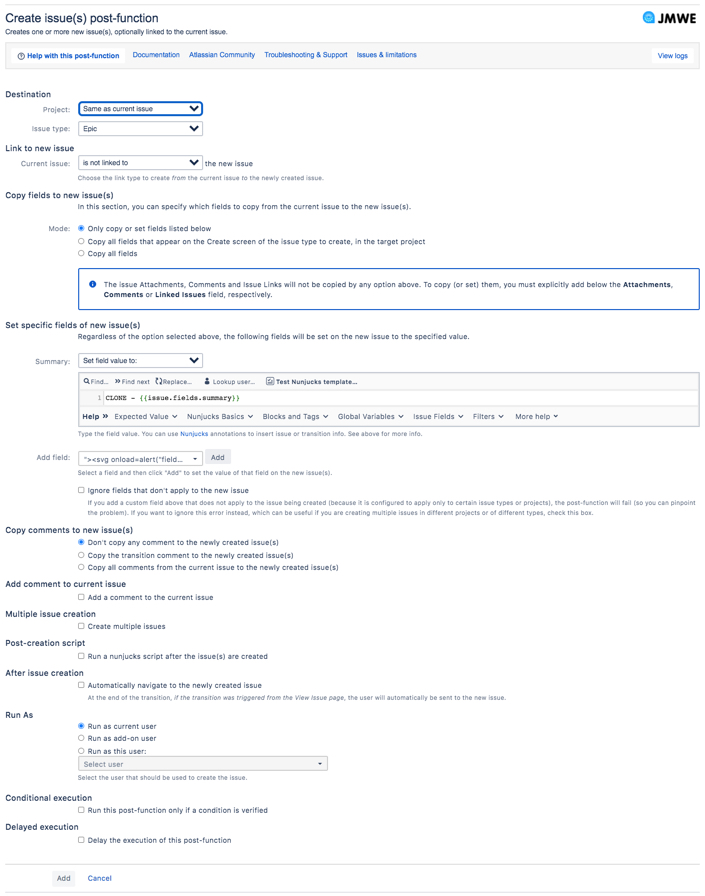
Configure the following details in the Create issue(s) post-function screen:
Destination
Specify the target project and issue type.
Project: Set the project where you want the new issue(s) to be created. Select one of the following to set the project as:
Same as the current issue: The same project as the current issue.
Calculated: A project whose key is the value returned from the Nunjucks template.
Projects: A project selected from the list.
Issue type: Select the issue type to be assigned to the newly created issue.
When the issue type isSub-task, specify its parent issue in theParent issuefield.Current issue: The current issue will be the parent of the newly created issue.Another issue: An issue whose key is the value returned from the provided Nunjucks template, will be the parent of the newly created issue.
When the issue type is Calculated, you can type the issue type name or ID or a Nunjucks template returning a valid issue type name or ID in the Nunjucks template editor.
When the issue type is:
Epic- set theEpic Namefield with a value using the Set fields of new issue option (explained below).Story- you might want to add the newly created story to an Epic. In this case, you should add theEpic linkfield with the key of the Epic as the value in the Set fields of new issue option (explained below)
When the Project is Same as the current project or Calculated the list of issue types contains all the issue types configured in your Jira instance, even though some of them might not apply to that project.
Link to new issue
Select a link type from drop-down to link the newly created issue to the current issue. The default value is "is not linked to", which will not create any link.
Copy fields to new issue(s)
Specify the current issue fields to be copied to the new issue(s).
Mode
Only copy or set fields listed below: If you select this option, only fields specified explicitly under the Set specific fields of new issue section will be copied or set on the new issue.
Copy all fields that appear on the Create screen of the issue type to create, in the target project: If you select this option, all fields that appear on the Create screen of the issue being created will automatically be copied from the current issue to the new issue, as if they were being entered by the user on the Create screen.
Copy all fields: If you select this option, all fields that have a value on the current issue and that apply to the issue being created will be copied from the current issue to the new issue.
Regardless of the selected option, if you add a field under the Set specific fields of new issue section, it will always be copied or set accordingly.
Set specific fields of new issue
Set the field values of the newly created issue, regardless of the option selected under Copy fields to new issue(s).
Summary: This added by default since it is required for any issue type.
Add field: Select a field from the drop down and click
Addto add the respective field. Set the field using one of the following options:Copy value from current issue: Copies the field value(s) from the current issue.
Set to other field of current issue: Sets the field to the value of another field of the current issue. Say, to set the Reporter of the current issue as the Assignee of the newly created issues.
Set field value to: Set the field to a specific value, which can include Nunjucks annotations.
For example: To set the Fix Version/s to 2.0, you can specify2.0in the value box.
Click the
Removeicon to remove the respective field.
Note that you can copy the issue links of the current issue to the newly created issue by setting the Linked Issues field to copy the values from the current issue.
Ignore fields that don't apply to the new issue: If you add a custom field(s) above that do not apply to the issue being created (because it is configured to apply only to certain issue types or projects), the post-function will fail (so you can pinpoint the problem). Select this option to ignore this error instead, which can be useful if you are creating multiple issues in different projects or of different types.
Copy comments to new issue(s)
Use this option to copy the existing comments/newly added comments of the current issue to the newly created issue.
Don't copy any comment to the newly created issue(s): This is the default option. Select this option to not copy comments to the newly created issue
Copy the transition comment to the newly created issue(s): Select this option to copy the comment added on the transition screen to the newly created issue.
Copy all comments from the current issue to the newly created issue(s): Select this option to copy all the comments on the current issue to the newly created issue.
The restricted comments to which the “Run as user” does not have permissions are not copied to the newly created issue.
Add a comment to current issue
Add a comment to the current issue: Select this option to add a comment to the current issue.
Comment (displayed only when the previous option is selected): Add any simple text, e.g.
This is a comment.You can also use Nunjucks annotations in the comment using variables. To find out more about the variables, see How to insert information using Nunjucks annotations.
Note that the newly created issue's key is available in the Nunjucks context as the newIssueKey variable.
For example : Issue {{newIssueKey}} has been created.
Comment visibility
Restrict to Group: Select a group from the drop-down to restrict the visibility of the comment to the members of the specified group. For no restriction, leave the field blank.
Restrict to Project Role: Select a project role from the drop-down to restrict the visibility of the comment to the users with selected project role. For no restriction, leave the field blank.
Restrict to Internal (Jira Service Desk only): Select this option to restrict the visibility of the comment to the Service Desk Agents and Collaborators.
Create comment as
Create comment as current user: Select this option to set the current user as the author of the comment created. This is the default value.
Create comment as add-on user: Select this option to set the add-on user as the author of the comment created.
Create comment as this user: Select this option to enable the associated drop-down. Select a user from the drop-down to set the specified user as the author of the comment created.
Multiple issue creation
Use this section to create multiple issues based on the settings you provide.
Create multiple issues: Select this option to create multiple issues at once. Provide an iterator script to control the number issues to be created. By default, the Create issue post-function creates one new issue.
Iterator (displayed only when the previous option is selected): Enter a Nunjucks template that must return a comma-separated list of values to iterate on. This can be either a comma-separated list of Strings, or a JSON array only if you check the "Iterator returns JSON" option. The post-function iterates over the list and creates one new issue per value. If configured, a new comment is also added to the current issue for each new issue created.
Template returning a comma-separated list of Strings
If the iteration template returns: jdoe,tblack then one issue will be created with the it variable containing"jdoe"and then another with the it variable containing"tblack". And if, in the configuration of the post-function, you are setting the "Assignee" field of the newly created issue to the following Nunjucks Template: {{it}} then the first issue will be assigned to jdoe and the second to tblack. And when you test the template the tester will return jdoe.
Examples:
Bug,Task
{{issue.fields["Multi-user Picker field"] | join(",","accountId")}}will create one issue per user in the Multi-user Picker field.{{range(1,5)}}will create 4 issues, with theitvariable containing numbers from 1 to 4.
Template returning a JSON array
If the iteration template returns a JSON array: [ {"assignee":"jdoe", "summary":"Issue for John Doe"} , {"assignee":"tblack", "summary":"Issue for Tim Black"} ] and you select the "Iterator returns JSON" option, then you'll be able to use {{it.assignee}} as the value for the Assignee field, and {{it.summary}} as the value for the Summary field.
Examples:
{{"jira-administrators" | groupMembers | dump }}with "Iterator returns JSON" option selected will create one issue per user in the 'jira-administrators' group{{
issue.fields["Multi-select field"] | dump }}with "Iterator returns JSON" option selected will create one issue per selected option in the Multi-select field
Post-creation script
Run a Nunjucks script after the issue(s) are created: Select this option to run a Nunjucks script after each new issue is created to make additional changes to the issue, such as adding a remote link or calling an external API. In scenarios where you use this script for setting issue field values, the respective value set during issue creation is overwritten.
Script: Enter the Nunjucks script as needed.
During the execution of the script, the newIssueKey variable points to the newly created issue.
After issue creation
Automatically navigate to the newly created issue: Select this option to automatically navigate the user to the new issue created at the end of the transition. This is applicable only when the transition is triggered from the View Issue page.
This requires the "Enable View Issue Screen Actions" option on the JMWE Configuration page to be enabled.
After the issue creation, the post-function stores
the key of the issue it creates in an issue property
jmwe.last.issue.createdof the current issue (the one on which the post-function runs) You can retrieve it later using theissuePropertyNunjucks filter. This can be used in other post-functions to refer to the last issue created by the Create issue post-function. If multiple issues are created, then the issue property refers to the last created issue.the key of the original issue in an issue property
jmwe-created-fromof the newly created issue. You can retrieve it later using theissuePropertyNunjucks filter. This can be used in other post-functions to refer to the issue from which the current issue was created using the Create issue post-function. You can also, use it in the JQL searches using the syntax:issue.property[jmwe-created-from].key = TEST-123
However, there are caveats you need to be aware of:
the post-function that reads this property needs to run after the Create Issue post-function finishes. You can ensure it by adding a delay.
If two users simultaneously run a transition on the same issue that creates a new issue, only the last issue created will be available in the
jmwe.last.issue.createdproperty. So this makes the feature unreliable if you're using the Create Issue post-function on multiple transitions of the same workflow.
Run As
Select one of the following to set the creator of the issue:
Run as current user
Run as add-on user
Run as this user: Select this option to enable the associated drop-down. Select a user from the drop-down to set the specified user as the creator new issue.
Conditional execution
Run this post-function only if a condition is verified: Select this option to execute this post-function based on the result of a Nunjucks template. See Conditional execution.
Condition (displayed only when the previous option is selected): Enter the Nunjucks template as needed.
Delayed execution
Post functions are provided with an option to delay their execution. You need to select the number of seconds to wait until the post-function is run, a default of 1 sec to a maximum of 20 seconds.
Workflows that depend on post functions being executed in a specific order fail due to the asynchronous nature of the Connect post-functions in Jira Cloud. One of the workarounds is to delay the execution of the post-functions and thereby create a more predictable execution order. For example, on the approval of a Story you want to create sub-tasks and immediately transition them; in this case, you will have to delay the execution of the Transition Linked Issues post-function, so that the sub-tasks are created before they are transitioned. See the use case below.
It is recommended to use the Sequence of post-functions post-function or Shared Action post-function post-function to run a list of post-functions in a sequence instead of applying a delay.
Sample use cases for Delayed execution
![]() On the creation of a Bug, assign it to a member of the QA team and then add the Assignee to the Watchers.
On the creation of a Bug, assign it to a member of the QA team and then add the Assignee to the Watchers.
![]() On the approval of a Story, create subtasks for Development and QA, and transition them to In Progress status.
On the approval of a Story, create subtasks for Development and QA, and transition them to In Progress status.
JMWE shows an error message on the issue view if any error occurs during the execution of the post-function. This message is displayed only if the current user is a Jira administrator.
Use case
A typical use case for this workflow is to create one or more issues during a transition. Consider a use case where you want to create a documentation ticket only if "Needed" is selected in the "Documentation ticket" checkboxes field. To configure this:
Add the Create issue post-function to the transition on whose trigger you want to create a documentation ticket
Select
Documentationfrom theProjectfield.Select
Documentfrom theIssue typefield.Select
caused byin theLink to new issuesection.Add an appropriate Summary (such as
Release documentation)Select the conditional execution and write the following template
{{ issue.fields["Documentation ticket"] | find({"value":"Needed"}) != null }}
Click here for more use cases.